Quantcast
Channel: Blender Developers Blog
Viewing all 177 articles
Browse latest View live

Assets – FileBrowser Preliminary Work – Experimental Build II

$
0
0
An 'Append' file browser with two blender files showing all their materials, objects and textures. Note the renamed bookmark on the left too.

So, as some of you may know already, since December 2014 and my three weeks spent in Amsterdam at BI, I’ve started working on the asset topic.

An ‘Append’ file browser with two blender files showing all their materials, objects and textures. Note the renamed bookmark on the left too.

So far, I did not do anything really directly related to assets (except early designing) – rather, I’ve been improving the editor I intend to use later for assets handling, i.e. the FileBrowser. I have already ported some cleanup/refactor and some minor features (like search field in header, operator to enforce mat/tex/etc. previews generation, …) in master, but most work is still in the dedicated ‘assets-experiments’ git branch, so I’ve made some experimental builds to (try to 😉 ) get a bit of testing. In those builds you’ll find:
  • Bookmarks and co using UIlists, with possibility to rename and reorganize bookmarks, plus the default features of UILists (filtering by name, and some sorting).
  • Possibility to list the whole content of a blend file (in append/link mode) at once (set ‘Recursion Level’ setting to 1), and in any mode, to list several levels of the directory tree in a “flat” mode (including blend files content if relevant, set ‘Recursion Level’ to 2 or more).
  • Consequently, possibility to append/link at once several items, either from a same .blend lib, or even from different ones.
  • Also, filtering by datablock types was added (so that you can see only e.g. materials and textures from all .blend libs from a same directory…).
  • Previews were added to object and group datablocks. Generation of those is handled by a python script (note: only handles BI renderer in this build, Cycles is yet to be added).

Note about previews of datablocks like materials, textures, etc., you have to manually generate them (from File -> Data Previews main menu), and then save the .blend file. On the other side, preview generation of objects and groups work with separated automated tasks ran on selected .blend files (which should rather not be opened at that time). This is quite inconsistent and shall be fixed for sure! On a more technical aspect (though it can also have effects on user PoV):

  • Directory listing is now also a background job (like thumbnail generation of images and .blend files), which means listing huge directories, or remote ones, does not lock the UI anymore.
  • Previews of datablocks (IDs) are now exposed in RNA, so third party scripts will also be able to generate their own previews if needed. Not all ID types have previews though (only object, group, material, lamp, world, texture and image ones currently), this is likely to change though.

So, as usual, any feedback is more than welcome! Note too that Windows behavior was not tested at all yet (don’t like starting my win WM :/ ), do not expect (too much) issues on this platform, but you never know with Windows. Cheers, and hope that new year will be full of good things for Blender and all of you!

Updates from May 2015

Warning: this will be mostly technical, since nearly nothing changed feature-wise. Testing is really needed though, internal changes are quite heavy!

You may find the updated builds at the usual place: http://download.blender.org/ftp/mont29/

From the “outside”, user point of view, this build does not differ much from previous one from January. Only changes (outside of master work, like preview size) are:

  • Some data was removed from the detailed view (modes and owner – UNIX-only, and Blender is not an OS file browser!).
  • Columns of compact (default) and detailed views are now fixed-size (among four choices, like for previews view). This is due to internal changes detailed below.

Internal changes were mostly done for future asset engines, but they also improve regular file browser experience, in a nutshell:

  • Smaller memory footprint when browsing directories with huge number of items (several thousands and more) – especially in case of preview display mode.
  • Much quicker display of those previews.

Plan is to merge this branch (or as much as possible of it) into master after 2.75 release.

Now for the technical details!

The main changes are under the hood – a full rewrite of our file listing code, to reduce memory usage and global computing effort. The idea is to keep as few as possible data from actual directory(-ies) listing, and to generate the full stuff needed to draw in filebrowser window only when needed, following the “sliding window” principle.

So, let’s say your file browser is currently centered on item 4000 in a directory containing 10000 files. We do store minimal data for those 10000 files (what’s needed for sorting and filtering), but only generate complete info (detailed types, strings for size, previews, etc.) for items through 3489 to 4512. Then, if user scrolls slightly to center item 4500, we only trash items up to 3988, and only have to generate those from 4513 to 5012… As a bonus, this means e.g. previews are generated for visible areas first, instead of ‘flat’ top-to-bottom process which would sometimes takes several tens of seconds to reach the bottom of the listing.

This allowed us to reduce our `direntry` struct size (it now basically wraps path and stat info). But the main improvement is with previews – since a few days previews are now 256*256 pictures in master. For a directory with 10000 images in preview mode, that means 2.6GiB of ram – just for previews! While with a sliding window of about one thousand items, we can limit this to a maximum of 266MiB – should we be browsing a directory with tens of thousands of items.

This is a rather extreme example of course, but not uncommon (think e.g. to render directories, or one with one or two hundreds of library .blend files read in new ‘flat’ mode…). And there is another reason why this change is needed: future asset engines. One can easily imagine on-line asset repositories with tens of thousands of items, you just cannot generate in Blender items for all of them at once! With that new code, asset engine only gives Blender the total number of entries, and then Blender requests for a limited range of those as needed (note that ordering and filtering will obviously also be deferred to asset engines).

.blend file items preview has also been moved into IMB_thumb area. This was mandatory, as we do not store previews for all items, we could not read them anymore while doing the initial listing. The main drawback is that it means on first run, .blend files will be read twice. However, there are several great advantages:

  • Consistency: .blend library items previews are now handled as any other (image, font, .blend file itself…) – this also means other areas of the code can easily get previews for them.
  • Performances: since they are handled by IMB_thumb, they also use the thumbnail caching system – in other words, .blend file is read once, regenerating the thumbnail later will only be a matter of reading the cached .png file!

Also, one side effect of those heavy changes is that previews should be generated much more quickly, since they now use a much lighter `BLI_task`-based threading, instead of the complex and heavy `Job`-based one.

Duplicated from https://mont29.wordpress.com/2015/01/14/assets-filebrowser-preliminary-work-experimental-build-i/ and https://mont29.wordpress.com/2015/05/12/assets-filebrowser-preliminary-work-experimental-build-ii/


Blender Dependency Graph Branch for users

$
0
0
softIKlegs

Hello! I”m visiting here to talk about work being done by Sergey, Joshua, Lukas and others updating Blender”s dependency graph. Anyone can test it by building the depsgraph_refactor branch from git.

How?

To make things interesting I”m testing on Elephants Dream files. To do this, I also have to update the project to work in post 2.5 blender ! This has the effect of exposing bugs/ todos in the branch by exposing it to a large set of working files, that have to match their previous known behavior. As a side effect, Blender Cloud subscribers and others should gain access to an updated Elephants Dream, and we”ll have a couple of new addons to update old files, and to create walk cycles on paths. Not to be stuck on old things, I”m also creating some useful rigs that are impossible without the refactor.

But, what is it?

Well, what is this “depsgraph” anyway, and why does it need updating? Simply put, without a depsgraph, you would not be able to have things like constraints, drivers or modifiers or even simple object parenting working in a reliable way. As we make our complicated networks of relationships, Blender internally builds a “A depends on B depends on C” type of network, that looks very much like a compositing node network. With this network, and for each frame, blender knows to update A before it updates B before it updates C. This is how, for instance, Child objects can inherit their parents” transforms before updating themselves.

Why is it being updated?

The current Dependency graph was written during Elephants Dream (haha! the circle is complete). This is way before the modern animation system of “everything can be animated” we have now. That design really worked for the rigid old system, in which only specific properties could be animated. Starting from 2.5 and until now, only dependencies that worked in 2.4x could reliably be expected to work, even though the interface allows you to create them. Think of driving a bone”s transform with another bone”s transform in the same rig, or parenting an empty to the body of a character, then IK”ing the arm to that empty, or trying to get a flower to open up based on the brightness of the sun lamp…. Even worse, the interface fully allows you to set up these drivers, but after you do, you get some strange lags and stutters, with very limited feedback as to why this happens. Previous patches enabled some very specific new setups, while not really changing the system under the hood. With the update, we can expect these setups and more to work, in a predictable and speedy way. This also lays the groundwork for future changes in blender, such as creating a new node system for modifiers constraints transforms particles, basically enabling more procedural-ism and flexible rigging. For now, in addition to “Animate all the things” we will be able to “Drive all the things” – very cool.

Introducing Dr. Dream


It turns out old Elephants Dream files *almost* work in 2.5 – 2.7, with the following exceptions:

  1. Action Constraints in Proog and Emo had “wrong angles” due to a bug in the old constraint. Since it got fixed, these numbers have to be updated.
  2. Shapekey drivers have different data-paths, reference shapekeys by number instead of by names, and making driven shapes broken.
  3. We used an old NLA feature that allows putting groups in the NLA and having strips refer to the rig inside the groups. This feature was removed during the animation system recode, and all that animation just stopped working – this is mainly true for all the robotic ducks in the background of shots.
  4. Another (terrible!) feature was the whole stride bone offsetting for walkcycles, that allowed for characters walking on paths. It was cumbersome to set up and resulted in much sliding of feet, and thus was never recoded in the new animation system. Which means all our walking-on-paths characters don”t walk anymore.
  5. Some cyclical dependencies (Empty -> Armature -> Empty again) cause bad/laggy evaluation. We simply got away with this in the few shots that it happens, but it is not guaranteed to ever render correctly again (even on 2.4!!!)
  6. Proog, Emo and animated characters are local in each shot, meaning fixes have to happen in every file.

To solve problem 1 – 3 I wrote an addon called Dr Dream – an inside joke we used to call many Elephants Dream scripts “Dr” something, and because this Dr. is actually helping the patient work in new blenders. Dr Dream also handles problem number 6 – being a script, it can be run in every file, fixing the local characters.

To solve problem 5 I will do the following: Nothing. The depsgraph refactor will take care of this for me!!!!

Problem 4 requires coding a python solution, this is a big project, and will be the subject of future post.

New Setup: soft IK


I”ll do a series of posts on useful rigging tricks possible in depsgraph_refactor. This current one is possible to add into existing and animated rigs – even Elephants Dream ones – and was not possible before the refactor, because it relies on driving the transformation of one bone by another in the same armature object. Some of the animators among you may have noticed a problem when animating IK legs: as the legs go from bent to straight (and sometimes bent again, like during a walk), the knees appear to “pop” in a distracting way. The reason turns out to be simple math: as the chain straightens, the velocity of the knee increases (in theory to infinity) causing the knee to pop at those frames. There”s a couple of excellent blog posts about the math and theory behind this here and here, and an old blog about in blender here.
If you want to check out the blend file in that video, you can download the blend here. Note that I”ve exaggerated the soft distance, it really works fine at 0.01 or less; you can edit the number in line 6 of lengthgetter.py, and then just rerun the script to see the effect. Too high a value (what I have) can make the character seem very bent-legged.

Animation System Roadmap – 2015 Edition

$
0
0
animato_logo

Hi there! It’s probably time to make this somewhat official:

Here is a selection of the most pressing “big ticket” animation related developments currently on my todo list. Do note that this is not an exhaustive list (for which there are many other items), but it does contain all the main things that I’m most aware of.

animato_logo

(This is cross-posted from my original post: http://aligorith.blogspot.co.nz/2015/03/animation-system-roadmap.html)

High Priority

NLA

* Local Strip Curves – Keyframing strip properties (e.g. time and influence) currently doesn’t update correctly.     [2.75]

Quite frankly, I’m surprised the current situation seems to work as well as it has, because the original intention here (and only real way to solve it properly) is to have dedicated FCurves which get evaluated before the rest of the animation is handled.

I’ve got a branch with this functionality working already – all that’s missing is code to display those FCurves somewhere so that they can be edited (and without being confused for FCurves in the active actions instead). That said, the core parts of this functionality are now solid and back under control in the way it was originally intended.

I originally wanted to get this polished and into master for 2.74 – definitely before Gooseberry start trying to animate, as I know that previous open movie projects did end up using the NLA strip times for stuff (i.e. dragon wings when flying), and the inclusion of this change will be somewhat backwards incompatible (i.e. the data structures are all still there – nothing changed on that front, but there were some bugs in the old version which means that even putting aside the fact you can’t insert keyframes where they’re actually needed, the animations wouldn’t actually get evaluated correctly!).

On a related note – the bug report regarding the renaming NLA strips not updating the RNA Paths: that is a “won’t fix”, as that way of keyframing these properties (that is used in master) was never the correct solution. This fix will just simply blow it all away, so no point piling another hack-fix on top of it all.

* Reference/Rest Track and Animation Layers Support  [2.76]

This one touches on two big issues. Firstly, there’s the bug where, if not all keyframed properties are affected by every strip (or at least set to some sane value by a “reference” strip), you will get incorrect poses when using renderfarms or jumping around the timeline in a non-linear way.

On another front, the keyframing on top of existing layers (i.e. “Animation Layers”) support doesn’t work well yet, because keyframing records the combined value of the stack + the delta-changes applied by the active action that you’re keying into. For this to work correctly, the contributions of the NLA stack must be able to be removed from the result, leaving only the delta changes, thus meaning that the new strip will be accumulated properly.

So, the current plan here is that an explicit “Reference Pose” track will get added to the bottom of NLA stacks. It will always be present, and should include every single property which gets animated in the NLA stack, along with what value(s) those properties should default to in the absence of any contributions from NLA strips.

Alongside this reference track, all the “NlaEvalChannels” will be permanently stored (during runtime only; they won’t get saved to the file) instead of being recreated from scratch each time. They will also get initialised from the Reference Track. Then, this allows the keyframing tools to quickly look up the NLA stack result when doing keyframing, thus avoiding the problems previously faced.

* A better way to retime a large number of strips [2.76/7]

It’s true that the current presentation of strips is not exactly the most compact of representations. To make it easier to retime a large number of strips (i.e. where you might want them to be staggered across a large number of objects, we may need to consider having something like a summary-track in the dopesheet. Failing that, we could just have an alternative display mode which compacts these down for this usecase.

Action Management [2.74, 2.75]

See the Action Management post. The priority of this ended up being bumped up, displacing the NLA fixes from 2.74 (i.e. Local Strip Keyframes) and 2.75 (i.e. Reference Track Support) back by 1-2 releases.

There are also a few related things which were not mentioned in that post (as they did not fit):

* Have some way of specifying which “level” the “Action Editor” mode works on.

Currently, it is strictly limited to the object-level animation of the active object. Nothing else. This may be a source of some of the confusion and myths out there…  (Surely the fact that the icon for this mode uses the Object “cube” is a bit of a hint that something’s up here!)

* Utilities for switching between Dopesheet and NLA.

As mentioned in the Action Management post, there are some things which can be done to make the relationship between these closer, to make stashing and layering workflows nicer.

Also in question would be how to include the Graph Editor in there somehow too… (well, maybe not between the NLA, but at least with the Dopesheet)

*  “Separate Curves” operator to split off FCurves into another action

The main point of this is to split off some unchanging bones from an action containing only moving parts. It also paves the way for other stuff like take an animation made for grouped objects back to working on individual objects.

Animation Editors

* Right-click menus in the Channels List for useful operations on those [2.75]

This should be a relatively simple and easy thing to do (especially if you know what to do). So, it should be easy to slot this in at some point.

* Properties Region for the Action Editor   [2.76]

So, at some point recently, I realised that we probably need to give the Action Editor a dedicated properties region too to deal with things like groups and also the NLA/AnimData/libraries stuff. Creating the actual region is not really that difficult. Again it boils down to time to slot this in, and then figuring out what to put in there.

* Grease Pencil integration into normal Dopesheet [2.76]

As mentioned in the Grease Pencil roadmap, I’ve got some work in progress to include Grease Pencil sketch-frames in the normal dopesheet mode too. The problem is that this touches almost every action editor operator, which needs to be checked to make sure it doesn’t take the lazy road out by only catering for keyframes in an either/or situation. Scheduling this to minimise conflicts with other changes is the main issue here, as well as the simple fact that again, this is not “simple” work you can do when half-distracted by other stuff.

Bone Naming  [2.77]

The current way that bones get named when they are created (i.e. by appending and incrementing the “.xyz” numbers after their names) is quite crappy, and ends up creating a lot of work if duplicating chains like fingers or limbs. That is because you now have to go through, removing these .xyz (or changing them back down to the .001 and .002 versions) before changing the action things which should change (i.e. Finger1.001.L should become Finger2.001.L instead of Finger1.004.L or Finger1.001.L.001).

Since different riggers have different conventions, and this functionality needs to work with the “auto-side” tool as well as just doing the right thing in general, my current idea here is to give each Armature Datablock a “Naming Pattern” settings block. This would allow riggers to specify how the different parts of each name behave.

For example, [Base Name][Chain Number %d][Segment Letter][Separator ‘.’][Side LetterUpper] would correspond to “Finger2a.L”. With this in place, the “duplicate” tool would know that if should increment the chain number/letter (if just a single chain, while perhaps preparing for flipping the entire side if it’s more of a tree), while leaving the segment alone. Or the “extrude” tool would know to increment the segment number/letter while leaving the chain number alone (and not creating any extra gunk on the end that needs to be cleaned up). The exact specifics though would need to be worked out to make this work well.

Drivers

* Build a dedicated “Safe Python Subset” expression engine for running standard driver expressions to avoid the AutoRun issues

I believe that the majority of driver expressions can be run without full Python interpreter support, and that the subset of Python needed to support the kinds of basic math equations that the majority of such driver expressions use is a very well defined/small set of things.

This set is small enough that we can in fact implement our own little engine for it, with the benefit that it could probably avoid most of the Python overheads as a result, while also being safe from the security risks of having a high-powered turing-complete interpreter powering it. Other benefits here are that this technique would not suffer from GIL issues (which will help in the new depsgraph; oddly, this hasn’t been a problem so far, but I’d be surprised if it doesn’t crop up its ugly head at the worst possible moment of production at some point).

In the case where it cannot in fact handle the expression, it can then just turf it over to the full Python interpreter instead. In such cases, the security limiting would still apply, as “there be dragons”. But, for the kinds of nice + simple driver expressions we expect/want people to use, this engine should be more than ample to cope.

So, what defines a “nice and simple” driver expression?

– The only functions which can be used are builtin math functions (and not any arbitrary user-defined ones in a script in the file; i.e. only things like sin, cos, abs, … would be allowed)

– The only variables/identifiers/input data it can use are the Driver Variables that are defined for that driver. Basically, what I’ve been insisting that people use when using drivers.

– The only “operators” allowed are the usual arithmetic operations: +, -, *, /, **, %

What makes a “bad” (or unsafe) driver expression?

– Anything that tries to access anything using any level of indirection. So, this rules out all the naughty “bpy.data[…]…” accesses and “bpy.context.blah” that people still try to use, despite now being blasted with warnings about it. This limitation is also in place for a good reason – these sorts of things are behind almost all the Python exploits I’ve seen discussed, and implementing such support would just complicate and bloat out little engine

– Anything that tries to do list/dictionary indexing, or uses lists/dictionaries. There aren’t many good reasons to be doing this (EDIT: perhaps randomly chosing an item from a set might count. In that case, maybe we should restrict these to being “single-level” indexing instead?).

– Anything that calls out to a user-defined function elsewhere. This is inherent risk here, in that that code could do literally anything

– Expressions which try to import any other modules, or load files, or crazy stuff like that. There is no excuse… Those should just be red-flagged whatever the backend involved, and/or nuked on the spot when we detect this.

* A modal “eyedropper” tool to set up common “garden variety” 1-1 drivers

With the introduction of the eyedropped tools to find datablocks and other stuff, a precedent has been set in our UI, and it should now be safe to include similar things for adding a driver between two properties. There are of course some complications which arise from the operator/UI code mechanics last time I tried this, but putting this in place should make it easier for most cases to be done.

* Support for non-numeric properties

Back when I initially set up the animation system, I couldn’t figure out what to do with things like strings and pointers to coerce them into a form that could work with animation curves. Even now, I’m not sure how this could be done. That said, while writing this, I had the though that perhaps we could just use the same technique used for Grease Pencil frames?

Constraints

* Rotation and Scale Handling

Instead of trying to infer the rotation and scale from the 4×4 matrices (and failing), we would instead pass down “reference rotation” and “reference scale” values alongside the 4×4 matrix during the evaluation process. Anytime anything needs to extract a rotation or scale from the matrix, it has to adjust that to match the reference transforms (i.e. for rotations, this does the whole “make compatible euler” stuff to get them up to the right cycle, while for scale, this just means setting the signs of the scale factors). If however the rotation/scale gets changed by the constraint, it must also update those to be whatever it is basing its stuff from.

These measures should be enough to combat the limitations currently faced with constraints. Will it result in really ugly code? Hell yeah! Will it break stuff? Quite possibly. Will it make it harder to implement any constraints going forth? Absolutely. But will it work for users? I hope so!

Rigging

It’s probably time that we got a “Rigging Dashboard” or similar…

Perhaps the hardest thing in trying to track down issues in the rigs being put out by guys like JP and cessen these days are that they are so complex (with multiple layers of helper bones + constraints + parenting + drivers scattered all over) to figure out where exactly to start, or which set of rigging components interact to create a particular result.

Simply saying “nodify everything” doesn’t work either. Yes, it’s all in one place now, but then you’ve got the problem of a giant honking graph that isn’t particularly nice to navigate (large graph navigation in and of itself is another interesting topic for another time and date).

Key things that we can get from having such a dashboard are:

1) Identifying cycles easier, and being able to fix them

2) Identifying dead/broken drivers/constraints

3) Isolating particular control chains to inspect them, with everything needed presented in one place (i.e. on a well designed “workbench” for this stuff)

4) Performance analysis tools to figure out which parts of your rig are slow, so that you can look into fixing that.

Medium Priority

NLA

* A better way of flattening the stack, with fewer keyframes created

In many cases, it is possible to flatten the NLA without baking out each frame. This only really applies when there are no overlaps, where the keyframes can simply be transposed “as is”. When they do interact though, there may be possibilities to combine these in a smarter way. In the worst case, we can just combine by baking.

* Return of special handling for Quaternions?

I’m currently pondering whether we’ll need to reinstate special handling for quaternion properties, to keep things sane when blending.

* Unit tests for the whole time-mapping math

I’ve been meaning to do this, but I haven’t been able to get the gtests framework to work with my build system yet… If there ever wee a model example of where these things come in handy, it is this!

Animation Editors

* Expose the Animation Channel Filtering API to Python

Every time I see the addons that someone has written for dealing with animation data, I’m admittedly a bit saddened that they do things like explicitly digging into the active object only, and probably only caring about certain properties in there. Let’s just say, “been there done that”… that was what was done in the old 2.42/3 code, before I cleaned it up around 2.43/2.44, as it was starting to become such a pain to maintain it all (i.e. each time a new toggle or datatype was added, ALL the tools needed to be recoded).

These days, all the animation editors do in fact use a nice C API for all things channels-related. Some of it pre-dates the RNA system, so it could be said that there are some overlaps. Then again, this one is specialised for writing animation tools and drawing animation editors, while RNA is generic data access – no comparison basically.

So, this will happen at some point, but it’s not really an urgent/blocking issue for anything AFAIK.

* To support the filtering API, we need a way of setting up or supplying some more general filtering settings that can be used everywhere where there aren’t any the dopesheet filtering options already

The main reason why all the animation editor operators refuse to work outside of those editors is that they require the dopesheet filtering options (i.e. those toggles on the header for each datablock, and other things) to control what they are able to see and affect. If we have some way of passing such data to operators which need it in other contexts (as a fallback), this opens the way up for stuff like being able to edit stuff in the timeline.

As you’ll hopefully be well aware, I’m extremely wary of any requests to add editing functionality to the timeline. On day one, it’ll just be “can we click to select keyframes, and then move them around”, and then before long, it’s “can we apply interpolation/extrapolation/handle types/etc. etc.” As a result, I do not consider it viable to specifically add any editing functionality there. If there is editing functionality for the timeline, it’ll have to be borrowed from elsewhere!

Action Editor/Graph Editor

* Add/Remove Time

Personally I don’t understand the appeal of this request (maybe it’s a Maya thing), but nonetheless, it’s been on my radar/list as something that can be done. The only question is this: is it expected that keyframes should be added to enact a hold when this happens, or is this simply expanding and contracting the space between keyframes.

* Make breakdown keyframes move relative to the main keyframes

In general, this is simple, up until the keyframes start moving over each other. At that point, it’s not clear how to get ourselves out of that pickle…

Small FCurve/Driver/etc. Tweaks

* Copy Driver Variables

* Operators to remove all FModifiers

Motion Capture Data

* A better tool for simplifying dense motion curves

I’ve been helping a fellow kiwi work on getting his curve simplifying algorithm into Blender. So far, its main weakness is that it is quite slow (it runs in exponential time, which sucks  on longer timelines) but has guarantees of “optimal” behaviour. We also need to find some way to estimate the optimal parameters, so that users don’t have to spend a lot of time testing different combinations (why is not going to be very nice, given the non-interactive nature of this).

Feel free to try compiling this and give it a good test on a larger number of files and let us know how you go!

* Editing tools for FSamples

FSamples were designed explicitly for the problem of tackling motion capture data, and should be more suited to this than the heavier keyframes.

Keying Sets

* Better reporting of errors

The somewhat vague “Invalid context” error for Keying Sets comes about because there isn’t a nice way to pipe more diagnostic information in and out of the Keying Sets callbacks which can provide us with that information. It’s a relatively small change, but may be better with

Pose Libraries

* Internal code cleanups to split out the Pose Library API from the Pose Library operators

These used to be able to serve both purposes, but the 2.5 conversion meant that they were quickly converted over to opertator-only to save time. But, this is becoming a bottleneck for other stuff

* Provide Outliner support for Pose Library ops

There’s a patch in the tracker, but this went about this in the wrong way (i.e. by duplicating the code into the outliner). If we get that issue out of the way, this is relatively trivial

* Pose Blending

Perhaps the biggest upgrade that can be made is to retrofit a different way of applying the poses, to be one which can blend between the values in the action and the current values on the rig. Such functionality does somewhat exist already (for the Pose Sliding tools), but we would need to adapt/duplicate this to get the desired functionality. More investigation needed, but it will happen eventually.

* Store thumbnails for Poses + Use the popup gallery (i.e. used for brushes) to for selecting poses

I didn’t originally do this, as at the time I thought that these sorts of grids weren’t terribly effective (I’ve since come around on this, after reading more about this stuff) and that it would be much nicer if we could actually preview how the pose would apply in 3D to better evaluate how well it fits for the current pose (than if you only had a 2D image to work off). The original intent was also to have a fancy 3D gallery, where scrolling through the gallery would swing/slide the alternatively posed meshes in from the sides.

Knowing what I know now, I think it’s time we used such a grid as one of the way to interact with this tool. Probably the best way would be to make it possible to attach arbitrary image datablocks to Pose Markers (allowing for example the ability to write custom annotations – i.e. what phenoms  a mouth space refers to), and to provide some operators for creating these thumbnails from the viewport (i.e. by drawing a region to use).

Fun/Useful but Technically Difficult

There are also a bunch of requests I’d like to indulge, and indeed I’ve wanted to work on them for years. However, these also come with a non-insignificant amount of baggage which means that they’re unlikely to show up soon.

Onionskinning of Meshes

Truth be told, I wanted to do this back in 2010, around the time I first got my hands on a copy of Richard William’s book. The problem though was and remains that of maintaining adequate viewport/update performance.

The most expensive part of the problem is that we need to have the depsgraph (working on local copies of data, and in a separate thread) stuff in place before we can consider implementing this. Even then, we’ll also need to include some point caching stuff (e.g. Alembic) to get sufficient performance to consider this seriously.

Editable Motion Paths

This one actually falls into the “even harder” basket, as it actually involves 3-different “hard” problems:

1) Improved depsgraph so that we can have selective updates of only the stuff that changes, and also notify all the relationships appropriately

2) Solving the IK problem (i.e. changed spline points -> changed joint positions -> local-space transform properties with everything applied so that it works when propagated through the constraints ok). I tried solving this particular problem 3 years ago, and ran into many different little quirky corner cases where it would randomly bug/spazz out, flipping and popping, or simply not going where it needs to go because the constraints exhibit non-linear behaviour and interpret the results differently.  This particular problem is one which affects all the other fun techniques I’d like to use for posing stuff, so we may have to solve this once and for all with an official API for doing this. (And judging from the problems faced by the authors of various addons – including the current editable motion paths addon, and also the even greater difficulties faced by the author of the Animat on-mesh tools, it is very much a tricky beast to tame)

3) Solving the UI issues with providing widgets for doing this.

Next-Generation Posing Tools

Finally we get to this one. Truth be told, this is the project I’ve actually been itching to work on for the past 3 years, but have had to put off for various reasons (i.e. to work on critical infrastructure fixes and also for uni work). It is also somewhat dependent on being able to solve the IK problem here (which is a recurring source of grief if we don’t do it right).

If you dig around hard enough, you can probably guess what some of these are (from demos I’ve posted and also things I written in various places). The short description though is that, if this finally works in the way I intend, we’ll finally have an interface that lets us capture the effortless flow, elegance, and power of traditional animating greats like Glen Keane or Eric Goldberg – for having a computer interface that allows that kind of fluid interaction is one my greatest research interests.

Closing Words

Looking through this list, it looks like we’ve got enough here for at least another 2-3 years of fun times 😀

More Dependency Graph Tricks

$
0
0
cropped

The new dependency graph enables several corner cases that were not possible in the old system, In part by making evaluation finer grained – and in part by enabling driving from new datablocks. A nice image to illustrate this is the data block popup in the driver editor:

In the previous image, the highlighted menu item is the only option that is guaranteed to update in current Blender. While testing and development is still very much a work in progress, the future is that all or most of those menu items would become valid driver targets. I’m in progress of testing and submitting to Sergey examples of what works and what doesn’t – this is going to be a moving target until the refactor is complete.

The two examples in this post are based on some of the new working features:

Driving from (shape) key blocks leads to amazing rigging workflow

That weird little icon in the menu above with a cube and key on it that just says ‘Key’ is the shapekey datablock, that stores all the shapekeys in a mesh. And here’s the insanity: you can now use a shapekey to drive something else? Why the heck is that cool, you ask? Well, for starters, it makes setting up correction shapes really, really easy.

Correction shapes here means those extra shapes one makes to make the combination of two other shapes palatable. For instance, if you combine the ‘smile’ and ‘open’ shapes for Proog’s mouth, you get a weird thing that looks almost like a laugh, but not quite, and distorts some of the vertices in an unphysical way. The typical solution is to create a third shape ‘smile+open’ that tweaks those errors and perfects the laughing shape. The great thing about the new depsgraph, is you can drive this shape directly from the other two effectively making a ‘smart’ mesh that behaves well regardless of how it is rigged. If you are curious about this, check out the workflow video below:

Finer Granularity Dependency Graph Tricks

The finer granularity of the Dependency graph lets us work around potential dependency cycles that would trip up the old object based system and make usable rig setups. Once such setup is at least sometimes called the ‘Dorito Method’ for reasons I have not been able to discern.
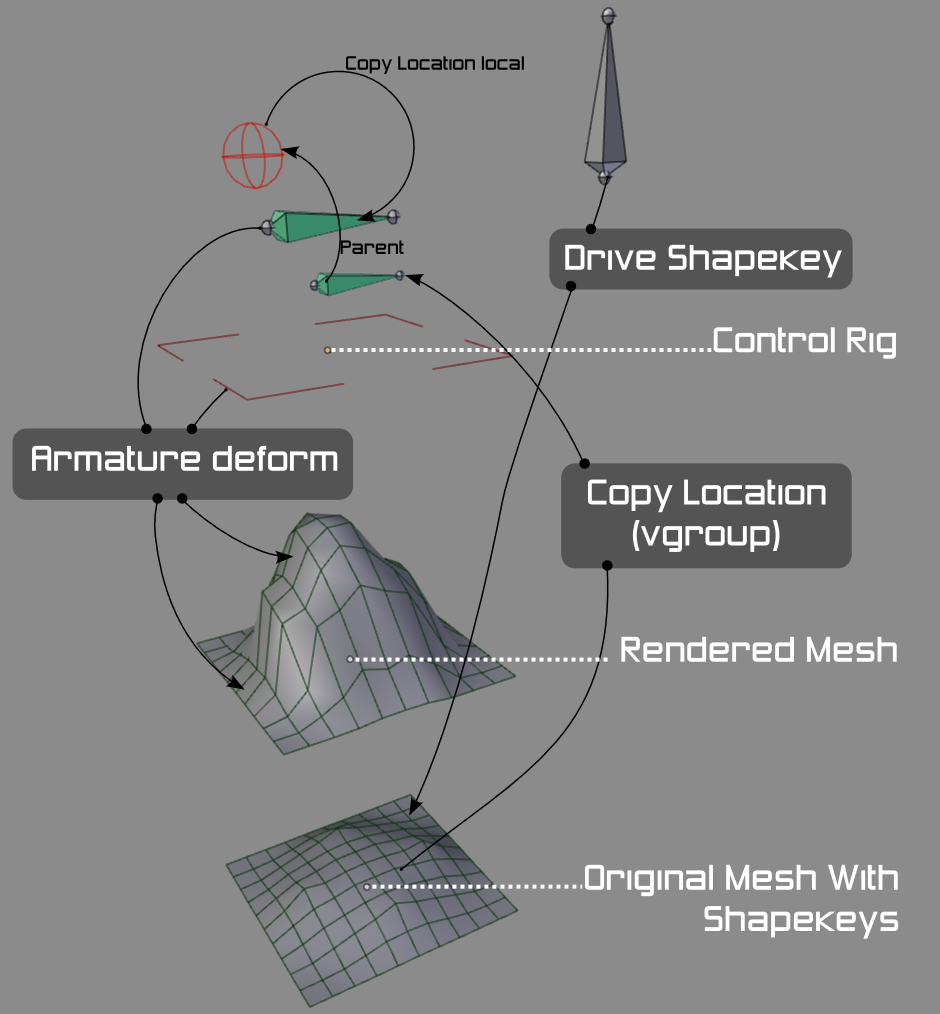
The goal of the setup is to deform the mesh using shapekeys, and then further enable small tweaks with deforming controls – an armature. The trick is, to make these controls ‘ride’ with the mesh + shapekeys, effectively a cycle (mesh->bone->mesh) but not really, because the first ‘mesh’ in that sequence is only deformed with shapekeys.
The trick to fix the above cycle is to duplicate the meshes: (mesh1->bone->mesh2) where mesh1 has the shapekeys and mesh2 is deformed by the bone. The sneaky bit is that both mesh objects are linked meshes, so they share the shapekey block.
The problem with blender before the dependency refactor, is that everything works *except* driving the shapes and the deforms from the same armature. This was due to the object only limitation of the dependency graph. Now that we have finer granularity (at least in the depsgraph_refactor branch) this problem is completely solved!

Since this is a tricky method, I’ve got some more documentation about it after the jump

  1. The above image is an exploded view; in the blend, all three objects (the rig and the two meshes) would be in the same location.
  2. The two meshes are linked-data objects. They share the same shapekeys, hence the same shapkey drivers.
  3. The bone on the right has a custom property that drives the shapekeys, deforming both meshes.
  4. The larger green bone and the square-shaped bone deform the topmost mesh via an armature deform
  5. The lower green bone copies the location of a vertex in the original mesh (child-of would be even more forgiving) This is not a cycle since the lower mesh is not deformed by the armature.
  6. The visible red control is a child of that bone
  7. The larger green bone (the deformer) has a local copy location to the visible red control

This could be simplified somewhat by adding a child of constraint directly to the controller (targeting the original mesh shapekey) but I prefer not to constrain animator controls.
If you were to attempt this in 2.73 or the upcoming 2.74 it would fail to update reliably unless you split out the bone that drives the shapekey into its own armature object. This has to do with the course-grained dependency graph in 2.74, which only looks at entire objects. The downside (and the upside of the dependency graph) is that you would end up with two actions for animating your character instead of one (bleh) or you might have difficulties with proxies and linked groups.
Some reference links below:

Further thoughts

If we had some kind of hypothetical “Everything Nodes” we could implement this kind of setup without duplicating the mesh, indeed, without having redundant parent and child bones – the 3D setup would be quite simple, and the node setup would be less hackish and more clear about why this is not a dependency. I’ve made a hypothetical ‘everything nodes’ setup below, to illustrate what the dependencies actually are. In a real system, it’s quite likely you’d represent this with two node trees, one for the rig object, and one for the actual mesh deformation.

Spherical Stereoscopic Panoramas

$
0
0
oculus_gooseberry

This week I visited the Blender Institute and decided to wrap up the multiview project. But since I had an Oculus DK2 with me I decided to patch multiview to support Virtual Reality gadgets.

Gooseberry Benchmark viewed with an Oculus DK2

Gooseberry Benchmark viewed with an Oculus DK2

There is something tricky about them. You can’t just render a pair of panoramas and expect them to work. The image would work great for the virtual objects in front of you, but it would have the stereo eyes swapped when you look at behind you.

How to solve that? The technique is the same one as presented in the 3D Fulldome Teaser. We start by determining an interocular distance and a convergence distance based on the stereo depth we want to convey. From there Cycles will rotate a ‘virtual’ stereo camera pair for each pixel to be rendered, so that both cameras’ rays converge at the specified distance. The zero parallax will be experienced at the convergence distance.

Oculus barrel correction screen shader applied to a view inside the panorama

Oculus barrel correction screen shader applied to a view inside the panorama

This may sound complicated, but it’s all done under the hood. If you want to read more about this technique I recommend this paper from Paul Bourke on Synthetic stereoscopic panoramic images. The paper is from 2006 so there is nothing new under the Sun.

If you have an Oculus DK2 or similar device, you can grab the final image below to play with. I used Whirligig to visualize the stereo panorama, but there are other alternatives out there.

Gooseberry Benchmark Panorama

Top-Bottom Spherical Stereo Equirectangular Panorama - click to save the original image

This image was generated with a spin off branch of multiview named Multiview Spherical Stereo. I’m still looking for a industry standard name for this method – “Omnidirectional Stereo” is a strong contender.

I would also like to remark the relevance of Open projects such as Gooseberry. The always warm-welcoming Gooseberry team just released their benchmark file, which I ended up using for those tests. To be able to get a production quality shot and run whatever multi-vr-pano-full-thing you may think of is priceless.

Builds

If you want to try to render your own Spherical Stereo Panoramas, I built the patch for the three main platforms.

* Don’t get frustrated if the links are dead. As soon as this feature is officially supported by Blender I will remove them. So if that’s the case, get a new Blender.

How to render in three steps

  1. Enable ‘Views’ in the Render Layer panel
  2. Change camera to panorama
  3. Panorama type to Equirectangular

And leave ‘Spherical Stereo’ marked (it’s on by default at the moment).

Last and perhaps least is the small demo video above. The experience of seeing a 3D set doesn’t translate well for the video. But the overall impression from the Gooseberry team was super positive.

Also, this particular feature was the exact reason I was moved towards implementing multiview in Blender. All I wanted was to be able to render stereo content for fulldomes with Blender. In order to do that, I had to design a proper 3D stereoscopic pipeline for it.

What started as a personal project in 2013 ended up being embraced by the Blender Foundation in 2014, which supported me for a 2-month work period at the Blender Institute via the Development Fund. And now in 2015, so close to the Multiview completion, we finally get the icing on the cake.

No, wait … the cake is a lie!

Links

  • Multiview Spherical Stereo branch [link] *
  • Gooseberry Production Benchmark File [link]
  • Support the Gooseberry project by signing up in the Blender Cloud [link]
  • Support further Blender Development by joining the Development Fund [link]

* If the branch doesn’t exist anymore, it means that the work was merged into master.

What is next?

Multiview is planned to be merged in master very soon, in time for Blender 2.75. The Spherical Panorama was not intended as one of the original features, but if we can review it in time it will go there as well.

I would like to investigate if we may need other methods for this techniques. For instance, this convergence technique is the equivalent of ‘Toe-In’ for perspective panorama. We could support ‘Parallel’ convergence as well, but ‘Off-Axis’ seems to not fit here. It would be interesting to test the final image in different devices.

If you manage to test it yourself, do post your impressions in the comment section!

Optimizing blender’s real time mesh drawing, part 1

$
0
0
ngon_current_final

Warning, this will get very technical, very quickly. Not for the faint of brain. You have been warned.

Reusing vertex data with indexed drawing

Blender uses tessellation to convert quads and ngons to triangles, the only diet a GPU can consume. Currently blender writes all data associated with a triangle in a buffer and draws the buffer with a single command. For simplicity let’s consider an Ngon with 5 vertices with position and normal data. The problem is that this introduces quite a lot of data duplication as you can see in the following picture:

ngon_current_final

As is evident, Position 1, Normal 1, Position 3, Normal 3, and Position 4, Normal 4 are used duplicated for each triangle that uses those data. Notice that these data are identical. Blender does allow normals of different polygons to be different for each vertex, but vertices and normals that belong to the same polygon are the same. Therefore they can be reused.

OpenGL has an easy way to to reuse data, called “indexed drawing”. Using this, what we do is upload all vertex and normal data once and then use indices to create triangles from these data. This looks like this:

ngon_indexed_final

This does not only de-duplicate vertex data but has another benefit. GPUs have a small cache of vertex indices where vertices that are transformed by the vertex shader are stored. Every time a new vertex index is encountered, the GPU checks if the index exists in its cache and if it does, the GPU avoids all shader work on that vertex and reuses the result of the cache. Not only have we eliminated data duplication, but every time a duplicated vertex is encountered, we get it for free (almost).

Vertex indices require a small amount of storage, which is 1 integer per vertex, or 3 per triangle, so they are not free. Also, they only save us memory if we use quads and ngons. In full triangle mesh case, we end up using more memory (remember, those tricks work only if triangles belong to the same ngon). However, given that good topology is based on quad meshes and that data savings get more substantial with more complex data formats, the benefits by far outweigh the issues. Here we only contemplated on a simple position – normal format, but if we include UV layers, tangents and whatnot, cost per vertex is much higher and so is the cost of data duplication and the savings we get when we avoid it.

When benchmarking indexed drawing in the blender institute, I found a pleasant surprise: Even though full triangle meshes need some extra storage for indices and will not use tranformed vertex cache, the NVIDIA driver in my GPU still draws such meshes faster. This is quite weird because the data that are sent to the GPU are actually more but this is still a positive indication to go on with this design.

Finally, we can go even further and blend together vertices from nearby polygons whose data are exactly the same. This gets much more complex with heavier vertex formats and could lead to slower data upload due to CPU overhead to detect identical vertices. Also it breaks individually uploading loop data (see below) because any change in any data layer will potentially invalidate those identical indices.

Testing of this optimization in a local branch gives about 25% reduction in render time compared to master and those optimizations will be part of blender for version 2.76.

Easy hiding, easy showing

Using indexed drawing is not only useful for speed and memory savings. It also allows us to rearrange the order of how triangles are drawn on will. This is especially useful if we want to draw polygons with the same material together: Instead of rearranging their data, we just rearrange the indices (less data to move around). But there is one use case where indexed drawing can really help: Hidden faces.

A lot of blender’s drawing code checks if a face is hidden and then it displays it. This check is done every frame
for every face. However there are few tools that invalidate those hiding flags. In fact we don’t need to do this check every frame, but instead cache the result and reuse it.

By using indexed drawing, we can arrange the indices of hidden triangles to be placed last on the triangle list. This makes it quite easy to draw visible only triangles, by just drawing up to the place where the hidden triangle indices begin. Blender master now employs such an optimization in wireframe drawing which reduces drawing overhead by about 40%

hidden


Update data when needed

Another big issue with blender is that we upload data to the GPU too often. A scene frame change will cause every GPU buffer to be freed, causing a full scene upload to the GPU. Apparently we don’t want that. Instead we want a system where certain actions invalidate certain GPU data layers. For example, if UV data are manipulated it makes no sense to reupload position or normal data to the GPU. If modifier stack is comprised of deform only modifiers, it should have a way to only reupload position data to the GPU for final display.

For this we need a system like the dependency graph, where certain operations trigger an update of GPU data. Without such a system, the only way to ensure that we see a valid result is to upload all data again and again to the GPU every frame. Which is pretty much what is happening right now in blender for the GLSL/material mode.

GLSL material mode basically iterates through every face of every mesh in the scene every time the window is refreshed and gathers the same data over and over, independently of whether they have changed or not. If we want to avoid this we need to cache those data but if we do that, then we also need to be able to invalidate them if an operation changes them, so that they are uploaded to the GPU properly and the user sees the result of that operation.

This is not the result of crappy programming, rather it’s due to the history of how blender’s drawing code evolved from an immediate mode drawing pipeline, where the only way to draw meshes was to basically re-upload all data every frame.

Bottom line, fast GLSL view means having such a system in place. Fast PBR materials and workflow shaders from the Mangekyo project imply fast GLSL, which means having such a system. So it is no wonder that we first have to tackle such a target first if we want to have a fancier viewport with decent performance.

Eurographics Symposium on Rendering

$
0
0
Former and current Cycles developers at EGSR

Last week (23rd – 26th June), Cycles developers Sergey Sharybin, Thomas Dinges and Lukas Stockner visited the EGSR in Darmstadt, a conference where new rendering papers and technologies are presented. It was great to meet other rendering people and get up to speed with latest research in this area.

Former and current Cycles developers at EGSR

Former and current Cycles developers at EGSR

Interesting papers that were presented and are potentially useful for Cycles:

  • Portal-Masked Environment Map Sampling by Benedikt Bitterli, Jan Novák and Wojciech Jarosz. This seems rather straightforward to implement on top of our current portals, but penalty is higher memory usage.
  • Practical Rendering of Thin Layered Materials with Extended Microfacet Normal Distributions by Jie Guo, Jinghui Qian and Jingui Pan. This is an interesting concept, something to look into but need to be careful from the actual implementation point of view.
  • Physically Meaningful Rendering using Tristimulus Colours by Johannes Meng, Florian Simon, Johannes Hanika and Carsten Dachsbacher. Even though Cycles is working with RGB colors this paper is still interesting to experiment a bit with. Simple idea could give similar texturing improvement: go from RGB to Spectrum space and tdo clamping/scaling of the spectrum similar to the paper and then go back to RGB (maybe with wider gamut?).
  • Consistent Scene Editing by Progressive Difference Images by Tobias Günther and Thorsten Grosch. This paper describes interesting approach of keeping scene editing real-time by avoid res-ampling full frame when only small areas of the image changed during editing.
  • Apex Point Map for Constant-Time Bounding Plane Approximation by Samuli Laine and Tero Karras. This paper describes exact solution to the problem we were having with camera space cull in the Gooseberry project. It’s quite simple to implement and will reduce number of false-positive visibility checks.
  • MBVH Child Node Sorting for Fast Occlusion Test by Shinji Ogaki and Alexandre Derouet-Jourdan. It describes approach of speeding up shadow rays cast with really small penalty. Something to experiment with at least.
  • Gradient-domain Bidirectional Path Tracing by Marco Manzi, Markus Kettunen, Miika Aittala, Jaakko Lehtinen, Fredo Durand and Matthias Zwicker. This exact paper talks about bidirectional tracing, but similar idea could be implemented for regular path tracer (in fact, it’s actually described in the previous paper). Would help reducing noise even in the cases like motion blur and camera DOF (using de-noising, so it’s not really am magic bullet still).

There are also some presentations which are not related on Cycles but still interesting for Blender:

  • MatCap Decomposition for Dynamic Appearance Manipulationby Carlos Jorge Zubiaga, Adolfo Muñoz, Laurent Belcour, Carles Bosch and Pascal Barla. This paper describes interesting approach to editing matcaps which might be interesting for sculpters. But it’s not really clear if this is something which should belong to Blender or rather other standalone application.
  • Distributed Out-of-Core Stochastic Progressive Photon Mapping by Tobias Günther and Thorsten Grosch. Similar idea could be used for distributed rendering in blender for cases when scene does not fit into the memory. Would need some adjustments to the algorithm so it works with path tracing and majority of implementation will be done in management software.
  • Separable Subsurface Scattering by J. Jimenez, K. Zsolnai, A. Jarabo, C. Freude, T. Auzinger, X-C. Wu, J. von der Pahlen, M. Wimmer and D. Gutierrez. Since the viewport is getting so much interesting real-time effects now, this paper is something to consider looking into.


Thanks a lot to Blender Foundation and Solid Angle, for making the trip and visit possible!

– Thomas, Lukas, Sergey –

Blender 2.8 – the Workflow release

$
0
0
11__lighting_01_03_02_C_smaller

This is a proposal for work focus on blender.org for the coming year.

I’ve written this because we keep missing bigger development targets – we don’t have enough time for larger projects. Instead too much time goes to releases, bug fixing, reviews, maintenance and support topics. The bug and patch tracker duties are keeping the best of our developers away from their own targets.  As a result we then don’t have time for design docs, for planning, logs and in-depth sessions with the module teams, and have no time for the artists who are involved to make sure we’re well aligned and know what to do. I think everyone has noticed that we’re floating too much, things are not clear. Where are we heading? Who does what, and how do we decide on things?

So – it’s time to act and gather the troops to refocus and get back energy, to maximize involvement from everyone who’s active in blender.org and make sure Blender can survive for many more years.

—– Blender 2.8 – Workflow release —–

Just like for 2.5, the proposal would be to take a bigger leap to a bigger release by not releasing for a year. The 2.76 release then would be the last ‘real’ version we do until 2.80 somewhere in 2016.

Obviously, for the crucial fixes and smaller (stable) features we can do update releases 2.77, 2.78 and 2.79.

Topics to finish for 2.8 could be:

  • UI work: wrap up Python configurability project, make Workflow based configuring possible
    Proof of concept: the stripped “Blender 101″ for high school kids.
  • Viewport project, including a PBR quality engine/editor that could replace BI and GE render.
  • A better designed integration of physics simulation in Blender
  • Invite the GE team to rethink game logic editing, to use viewport and new physics
  • Don’t add the half finished Gooseberry targets but take the time needed to code it well:
    Particle nodes, hair nodes, simulation nodes, modifier nodes…
  • Asset managing and browsing, linking, references, external files in general.
  • Integration in non Blender pipelines.

Practical considerations:

  • Move development to special 2.8 branch(es)
  • Module teams are empowered to cleanup quite radically and get rid of legacy code.
  • The 2.8 series is allowed to be not 100% compatible with 2.7x. (Physics, particles, games).
  • Spend time on organizing ourselves better, agreed designs should lead to more empowerment.

And some core principles to agree on:

  • We reconfirm and where needed update the 2.5 spec docs.
  • Stick to existing Blender data structures and code design for as much as possible.
  • Make Blender ready to survive until 2020, but…
    … start collecting the list of bigger redesign issues we need to for a 3.0 project
  • Bring back the fun in Blender coding! :)

The code.blender.org article for the roadmap of 2014-2015 is still valid in my opinion. We just need to take a break of 9-12 months now, to make it work for real.

Blender 2.8 Workflow Sprint

In the coming months we can discuss and review the plans and make sure we’re 100% aligned on the 2.8 targets and for other work during the coming years. We should also meet and have good feedback sessions on it. So I propose to use the Blender Conference in October as a deadline, and organize a workshop in the week before.

  • Four days of workshops and design sessions, in the week before Blender Conference.
  • Travel and hotel covered for by BF (and Dev Fund, or a new fund raiser?)
  • We should try to get someone from every (active, involved) module team on board. Also key user/contributors have to be on board. But it’s also more efficient to keep it compact.
  • Proposal: we do this invitation-only: First we invite the 5 most active contributors of past years. Together they then invite persons more, until we have 12 (?) people.
  • Sprint sessions can be in parallel too – UI, Viewport, Physics, etc. Let’s make it public as good as possible.
  • The Sprint results get presented and reviewed during further on sessions during the Blender Conference.

Seven years ago, back in 2008, we also took a break for more than a year, to get the 2.5 project started up. It was a very exciting period where a lot of new things were possible and could happen, even though we didn’t finish everything… it gave us quite a solid foundation to build on, attracting a lot of new developers and great features.
I realize we have to be realistic now, not everything will be possible. But we also shouldn’t stop dreaming up a good future for Blender. Let’s take a break from our demanding release cycle, rethink it all, but not for too long. Let’s cherish what we agree on and enjoy the freedom of a configurable workflow that will enable you to do what you think is best… for making 3d art, games, film and animation!

-Ton-


Force Fields and Turbulence

$
0
0
untitled

Turbulence in Blender can cause serious problems, due to the fact that it is not a fluid-like turbulence field: The forces are essentially random, which means they are not divergence-free. A true fluid flow velocity field (derived from the pressure gradient) would instead always be divergence-free, meaning there are no “sinks” and “sources” of matter in the simulation. The effect of this mathematical property is that a turbulence field in Blender can easily “trap” particles or simulated vertices (cloth, hair) in a small area around an attractor point. The simulation can freeze in an awkward state or start to jitter, and un-freezing requires strong counterforces that can destabilize the simulation. With a divergence-free field the vertices can not easily be trapped and the resulting behavior is much more like that of objects following the flow of air or liquid.

A divergence-free field can be constructed from a scalar field using a curl operator. The entire procedure is described in the paper “Curl-Noise for Procedural Fluid Flow” (Bridson, Hourihan, Nordenstam 2007) http://www.cs.ubc.ca/~rbridson/docs/bridson-siggraph2007-curlnoise.pdf

Additional features described in the paper include using 4D noise for time-varying fields and the use of pseudo-advection over multiple octaves.

The Custom Manipulator Project (Widget Project)

$
0
0
Manipulator_Spin

It seems like it’s still unclear what the widget project actually is and what it means, so it’s really time to make things a bit more clear. Especially, to justify why this project is important for the Blender user interface.

 
Sidenote: Since I’m currently also working on normal widgets like buttons, scrollbars, panels etc, I actually prefer to call the widget project ‘custom manipulator project’. Just to avoid confusion.

– Julian


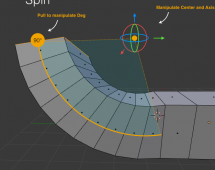
Manipulator_Spin (Mockup)


Blender suffers from an old disease – the Button Panelitis… which is a contagious plague all the bigger 3d software suites suffer from. Attempts to menufy, tabify, iconify, and shortcuttify this, have only helped to keep the disease within (nearly) acceptable limits.

We have to rethink adding buttons and panels radically and bring back the UI to the working space – the regions in a UI where you actually do your work.  This however, is an ambitious and challenging goal.


Here, the widgets come into play! Widgets allow to tweak a property or value with instant visual feedback. This of course, is similar to how ‘normal’ widgets like buttons or scrollbars work. The difference is, that they are accessible right from the working space of the editors (3D View, Image Editor, Movie Clip Editor, etc). It is simply more intuitive than having to tweak a value using a slider button that is in a totally different place, especially when the tweaked value has a direct visual representation in the working space (for instance, the dimensions of a box).

Being able to interact with properties, or in fact with your content, directly, without needing to search for a button through a big chunk of other buttons and panels, is like UI heaven. This is how users should be able to talk to the software and the content they create in it. Without any unnecessary interfaces in-between. Directly.


Blender already has a couple of widgets, like the transform manipulator, Bézier curve handles, tracking marker handles, etc. But we want to take this a step further: We want to have a generic system which allows developers to easily create new and user friendly widgets. And, we want the same to be accessible for Add-on developers and scripters.

It’s also known that Pixar’s Presto and DreamWorks’ Apollo in-house animation tools make heavy use of widgets.


In Blender, there are many buttons that can be widgyfied (as we like to call it): Spot-lamp spot size, camera depth of field distance, force field strengths, node editor/sequencer backdrop position and size, …

Also, a number of new features becomes possible with a generic widget system, like a more advanced transform manipulator, or face maps (groups of faces) with partially invisible widgets, similar to the ones from the Apollo demo.

Actually, all these are already implemented in the wiggly-widgets branch :)


widgets_07 The new transform manipulator


widgets_gif The spot size widget (GIF – click to play)


widgets_gif_02 Face map widgets (GIF- click to play)


Current state of the project:

The low-end core can be considered as quite stable and almost ready now. Quite a few widgets were already implemented and the basic BPY implementation is done.

The next steps would be to polish existing widgets, create more widgets and slowly move things towards master. It’s really not the time to wrap things up yet, but we’re getting closer.

Focus for the next days and weeks will likely be animation workflow oriented widgets, like face maps or some special bone widgets (stay tuned for more info).


A bit on the technical side:

Widgets are clickable and draggable items that appear in the various Blender editors and they are connected to an operator or property. Clicking and dragging on a widget will tweak the value of a property or fire an operator – and tweak one of its properties.

Widgets can be grouped into widgetgroups that are task specific. Blender developers and plugin authors alike, can register widgetgroups to a certain Blender editor, using a system very similar to how panels are registered for the regular interface. Registering a widgetgroup for an editor, will make any editor of that type display the widgets the widgetgroup creates. There are also similarities to how layouts and buttons function within panels. The widgetgroup is responsible for creating and placing widgets, just as a panel includes code that spawns and places the buttons. Widgetgroups also have a polling function that controls when their widgets should be displayed.

For instance, the transform manipulator is a widgetgroup, where individual axes are separate widgets firing a transform operator. Just as every 3D editor has a toolbar, registering a manipulator widgetgroup with the widgets used for object transform, will create those widgets for every 3D editor.

Needless to say, plugins can enable their own widgets this way and tweak their widgetgroups to appear under certain circumstances through the poll function, as well as populate the editors with widgets that control the plugin functionality.

(A more detailed and technical design doc will follow, this is more like a quick overview)


So! Hopefully this helped to illustrate what the custom manipulator/widget project is, and why it matters.

It is a really promising approach to reduce UI clutter in button areas and for bringing the user interface back to the viewports. Work with your content, not with your software. It’s about time.


– Julian and Antony


Current Asset Project Status & Plans

$
0
0
Amber at work!

This article tries to summarize the more complete design doc and presents current state of the “Asset Project” in Blender.

Core Concepts

The main idea of current work is to keep Blender’s library system and build asset management over it, using “Asset Engines”, which will be python add-ons communicating with Blender through an “AE API”, in a similar way to our “Render Engine API” used e.g. by Cycles, POVRay, and other external renderers.

To simplify, those asset engines are here to provide to Blender lists of available items (they also include filtering & sorting), and ensure relevant .blend files are available for Blender at append/link time (or when opening a file). More advanced/complex pre- and post-processing may be executed through optional callbacks.

This allows us to not define “what is an asset” in Blender – Blender only knows about datablocks. Assets are defined by the engines themselves. The only addition to current Blender’s data model is a way to keep track of assets, variants and revisions (through UUIDs).

Work Landed in Master

A first rather big task has been to enhance filebrowser code and make it ready (i.e. generic enough) for assets listing. Final stages have been merged in master for Blender 2.76 – main immediate benefits include the ability to list content of several directories and/or .blend files at once, the ability to append/link several datablocks at once, a much quicker generation of thumbnails (when enabled), and a globally reduced memory footprint (especially when listing directories whit huge number of entries and enabling thumbnails).

Previews were also added to some more datablocks (objects, groups, scenes), and behavior of materials/textures previews generation was fixed.

Work Done in Branches and TODO’s

Fixing Missing-libs Issue

Currently, if you open a .blend file linking some data from a missing library, that linked data is totally lost (unless you do not save the main file). Work has been done to rather add placeholders datablocks when the real one cannot be linked from a library for some reason. This allows to keep editing the main .blend, and either fix the library path in the Outliner or make missing lib files available again at expected location, save and reload main .blend file, and get expected linked data again.

In addition, to remove the needed ‘save & reload file’ step, work is in progress to allow hot-replacing of a data block by another in Blender, this should allow to just fix broken lib path and automatically reload missing data.

Asset Engine Experiment – Amber

Amber is the experimental asset engine developed in parallel with the AE API. It also aims at being a simple, file-system based engine distributed as an add-on with Blender, once asset engine work is ready to be released!

It is based on file system storage with a JSON file to define assets & meta-data (like tags, descriptions, …).

Amber at work!

Amber at work!

Currently the basic browsing/importing part is up and running – in the picture above you can see three file browsers and a text block:

  • The first browser (a “normal” one) shows the content of the test-case Amber repository (you’ll note the `__amber_db.json` file which defines an Amber repository).
  • The second browser (an “Amber” one) shows that same directory as reported by our asset engine.
  • The third browser (an “Amber” one too) shows the “filtering by tags” of Amber in action (the “character” tag is inclusive-selected).
  • The text block shows an excerpt of the `__amber_db.json` content, with the definition of one asset and the definition of tags.

You can find that test-repo in that archive.

There are quite a few topics to be implemented yet to consider this work to be (even barely) usable, mostly:

  • Add the “reload” ability (which also depends on the “missing-libs” work actually), such that Blender can query asset engines for updates (on file load or from user request).
  • Currently you have to generate that JSON file by hand, which isn’t terribly fun. This will be addressed once the loading/reloading part is reasonably finished, though.

Conclusion (For Now)

Foundations of the future asset handling are mostly defined (if not coded) now, though we still have much work ahead before having anything really usable in production. Once again, this is a very condensed summarizing, please see the design task (and all sub-tasks and branches linked from there) for more in-depth and technical doc and discussions. And please do build and test the branches if you want to play with what’s already done – the earlier the testing and feedback, the better the final release!

Debugging Python code with PyCharm

$
0
0
blender-debugging

During the Ask a Developer session at the Blender Conference last weekend, there was a request for easy debugging of Python code. Fortunately, with PyCharm or Eclipse/PyDev, this is quite easy. Personally I use PyCharm, but the process should be pretty similar for Eclipse/PyDev. Besides Blender and your IDE, you need more two ingredients:

  1. The egg file from your IDE. For PyCharm, this file is called “pycharm-debug-py3k.egg” and you can find it in PyCharm’s “debug-eggs” directory. Make sure you get the one for Python 3. There is no need to do anything with the file, just note down its path. On my machine, it is “/home/sybren/pycharm/debug-eggs/pycharm-debug-py3k.egg”, but yours may be in “C:\Program Files\…”
  2. My addon remote_debugger.py from GitHub.

Update 1-Nov-2015: You need the Professional version of PyCharm for this to work. Fortunately, if you can show that you actively participate in an Open Source project, you can get a Pro license for free.

Step 1: Install and configure the addon

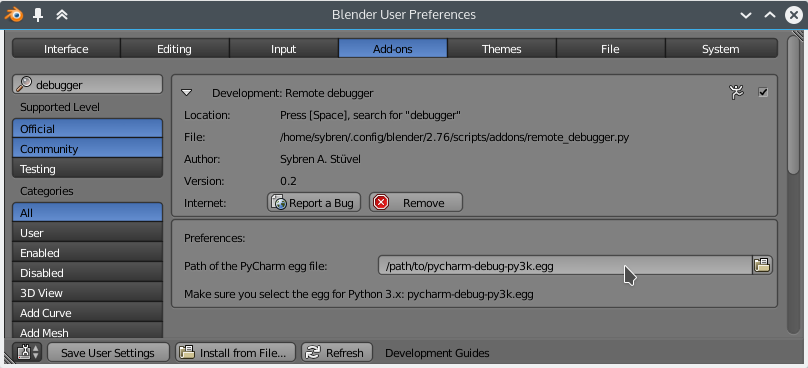
Once you’ve downloaded remote_debugger.py, install it in Blender. Open the User Preferences window, and hit the “Install from file…” button at the bottom.

Configuring the addon

Configuring the addon

In the addon preferences, point Blender to your “pycharm-debug-py3k.egg” file. On my Linux machine it’s at /home/sybren/pycharm/debug-eggs/pycharm-debug-py3k.egg. Since you’re a developer, I’ll assume that you know where you installed your IDE.

Step 2: Create the debug server configuration

PyCharm debugger configuration

PyCharm debugger configuration

In PyCharm, create a new Python Remote Debugger configuration: Run → Edit Configurations… → + → Python Remote Debug.

Make sure Local Host Name is set to “localhost” and Port to “1090”. You can use another port number if you want, but be sure to update the addon source code to reflect this.


Step 3: Start the debug server

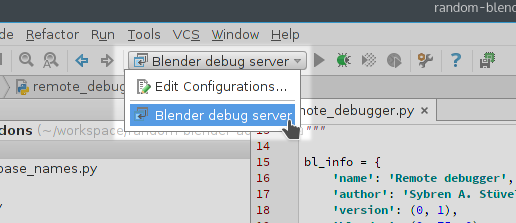
Starting the debug server in PyCharm

Starting the debug server in PyCharm

Start the debug server from the Run/Debug dropdown. Don’t forget to click the little bug to actually start it.

Step 4: Connect Blender

Connecting the debugger from Blender

Connecting the debugger from Blender

In Blender, hit space in the 3D viewport and search for “debugger”. Choose “Connect to remote Python debugger”. Once you do this, you will see that Blender freezes up. This is expected behaviour. Switch to PyCharm, and you’ll see that it has paused the execution of the addon just under the “pydevd.settrace(…)” call. Press the green “play” button (or press F9) to un-freeze Blender.

Step 5: Debug!

Now that everything is connected, you can debug your code like you’re used to. Set breakpoints, step through code, inspect variables, etc.

Some final words

The order in which things are set up are quite important. You only need to do steps 1-2 once, which is nice. Be sure to do steps 3 and 4 in that order, as it makes things a bit more predictable and works well.

Here are some additional links that may help with the remote debugging. You can always try to contact me (Sybren) on IRC in #blenderpython if you have questions.

2.8 project developer kickoff meeting notes

$
0
0
41qX6YdIJ7L._SX258_BO1,204,203,200_

At the 2015 blender conference the attending developers sat down to discus things we as a group wanted the 2.8 project to be a software engineering perspective.  The things discussed below are intended to become effective with the 2.8 project and any changes in supported hardware will be kept as minimal as possible.

C++ 11 / C99

Blender is written in C, C++ and Python mainly. currently we use C++98, C89 and Python 3.4.

There is consensus to allow C++11 and C99 for the features that make sense and are supported by our current hosting compilers (Microsoft Visual Studio 2013 is the lowest common denominator here ).  This should let us write better code thanks to some stupid limitations being lifted but it will also need us to bump the platform requirements and in particular support for Mac OS X versions lower then 10.8 and Linux versions that ship with a glibc older then 2.14 would be dropped.

OpenGL

Currently blender uses OpenGL in a way that remains compatible with versions 1.4 of the standard. Over the last 20 years graphics hardware has evolved greatly and some of the concepts in accessing this hardware have also changes. In 2009 the OpenGL 3.2 standard was released that for the first time deprecated the old way of doing things. Today a lot of platforms even do not allow this old way of accessing the hardware and some disallow use of newer features when legacy calls are used (MacOS X is an example of this).

The developers universally agree that this will happen and is unavoidable. We also felt that this move away from immediate mode towards VBOs and GLSL will need to happen, regardless of the new viewport design. Antony Riakiotakis started this conversions, but there is a significant amount of work left, and it is unclear at this point how this is to be approached best.

This move will have some downsides, such as loss of hardware acceleration on early Intel i9xx cards. Any post-2008 Nvidia or AMD hardware should remain unaffected.

Scons

The Blender developers currently maintain 2 buildsystems (cmake and scons). Most of us use CMake, more than we use SCons, and collectively we feel that dropping one would free up a big enough amount of resources that the benefit would far outweigh the costs. There are buildsystem-specific bugs, it adds to difficulty of becoming a contributor, and the builds on both systems are currently inconsistent.

The remaining work lies mainly in supporting the linux release builds with cmake, and verifying the MacOS X release build against the scons version. Brecht and Martijn have volunteered to get this done.

Replacing or dropping code

There are various opinions on what parts of Blender are broken, hard to maintain, or lack a future. Mentioned were the sequencer, game engine, openimage-io, constraints, particle system, and OpenCollada. The only one we could reach some kind of consensus on is OpenCollada: the library and integration make up for 1/3 of the binary size of Blender, and we currently only have Gaia to maintain it (who was not present at the meeting). We decided to seriously consider dropping it for 2.8.

The particle system and constraints may need a complete overhaul.

The sequencer and game engine are in serious danger of removal, if we cannot come up with a good solution during the 2.8 project.

OpenNL was also discussed and it seems most of the usages could also be covered by the Eigen library.


Finally, it is good to remember that this discussion is about what could be good for Blender and the Blender developers from a software engineering perspective, and what could make it easier for us to deliver a better Blender. We make Blender for artists first, and in that sense this list cannot and should not be interpreted as a complete representation of the 2.8 project.


Test Build – Live Reloading & Relocating Of Libraries

$
0
0
blender_outliner_lib_reload_small

So, finally got something that seems to be kind of working in id-remap branch (see also the associated design task), and hence made some test builds available (updated 2015/11/30, see log below).

WARNING: Those builds are highly experimental, do not use them in production, nor on any file you want to keep valid! No corruption is expected – but you know, we do experimental builds for a good reason, issues are never expected. 😉

That said, let’s see a bit what id-remap is about. It’s a spin-off from Asset project, which requires ability to hot-reload libraries in Blender. This lead to hot-remapping of ID datablocks inside Blender, that is, the ability to totally replace all references to a given datablock (e.g. a material) by another one of the same type (and expected to be compatible!).

In theory this was rather simple, we already had tools to loop over ID usages in our code, but to use them in that case we need a totally valid and consistent handling of referencing and dereferencing IDs. I won’t go into dirty details here, but our master branch was far from that state. Some issues were fixed directly in master, but most implied some more involved changes that will likely rather end up in the 2.8 project.

All in all, code in id-remap should now allow for several cool features:

  • Possibility to remap an ID, that is, replace all usages of a given datablock by another (compatible) one. So e.g. you can replace all usages of a given material by another. Or all usages of a low-res mesh by its high-res version, etc.
  • Possibility to live-reload libraries.
  • Possibility to live-relocate libraries (i.e. select a new one to replace an existing or missing one).
  • Possibility to really, easily and properly delete a datablock in Blender (without having to save and reload .blend file).
  • etc.

The three first points above have been implemented in id-remap, and I’ve tested successfully library reloading with some rather heavy and complex files from Gooseberry, but now I need some real-life testing!

blender_outliner_lib_reload

To reload or relocate a library in those experimental builds, just go to the Outliner, select the Blender File view, right-click on the library you want to refresh, and select the desired option (if you want to relocate, a filebrowser will open to select new lib .blend).

If everything goes smooth (yeah I know, it won’t), you should see nothing, aside from linked objects being updated. Please report any issue to the bug tracker, as usual, stating clearly in title it’s about id-remap. :)

Updates Log

This lists changes/updates/fixes of each new testbuild:

  • 2015/11/30 build:
    • Updated against master f798c791cda, id-remap 1da2edfb257e.
    • Fixes bug when reloading and linked object is selected (reported by zeauro over IRC, thanks).


New Cycles Benchmark

$
0
0
0001

Blender Institute prepared six Blender files for testing Cycles rendering with CPU/GPU, using various settings and design styles but based on actual production setups. On the links below you can inspect the spreadsheet with results, and load the .blend file collection.

The goal is to have an overview of systems that are used or tested by developers of Cycles. We aim at updating it regularly, also when new hardware comes in – and especially when render features improve in Cycles.

Most strikingly so-far is that the performance of CPUs is in a similar range as GPUs, especially when compared to costs of hardware. When shots get more complex, CPUs win the performance battle. That confirms our own experience that fast GPU is great for previewing and lighting work, and fast CPU is great for the production rendering. But… who knows what the future brings.

Feel free to post own stats and observations on this blogpost! Maybe other .blend files should be added?

Cycles benchmark zip (530 MB)

Google doc spreadsheet

classroom-200x107 gooseberry-shot-200x98 splash_274-200x92 v1.2_day_1080-1024x576-200x113 bmw-cycles-200x113 0001

-Ton-


Proposal for Caching, Nodes and Physics Development in Blender 2.8

$
0
0
blog1

The work-in-progress proposal for the Blender 2.8 version plans for caching, nodes and physics is progressing steadily. If you are an experienced artists or coder or just want to have a sneak-peek, you can download a recent version from the link at the bottom.

Feedback is appreciated, especially if you have experience with pipelines and complex, multi-stage productions. The issues at hand are complex and different perspectives can often help.

caching_workflow_animexport

Mockup for exporting animation using nodes

Summary

For the 2.8 development cycle of Blender some major advances are planned in the way animations, simulations and caches are connected by node systems.

It has become clear during past projects that the increased complexity of pipelines including Blender requires much better ways of exporting and importing data. Such use of external caches for data can help to integrate Blender into mixed pipelines with other software, but also simplify Blender-only pipelines by separating stages of production.

Nodes should become a much more universal tool for combining features in Blender. The limits of stack-based configurations have been reached in many areas such as modifiers and simulations. Nodes are much more flexible for tailoring tools to user needs, e.g. by creating groups, branches and interfaces.

Physical simulations in Blender need substantial work to become more usable in productions. Improved caching functionality and a solid node-based framework are important prerequisites. Physics simulations must become part of user tools for rigs and mesh editing, rather than abstract stand-alone concepts. Current systems for fluid and smoke simulation in particular should be supplemented or replaced by more modern techniques which have been developed in recent years.

Current Version

The proposal is managed as a sphinx project. You can find a recent html output in the link below.

http://download.blender.org/institute/nodes-design/

If you are comfortable with using sphinx yourself, you can also download the project from its SVN repository (*):

svn co https://github.com/lukastoenne/proposal-2.8.git

Use make html in the proposal-2.8/trunk/source folder to generate html output.

(*) Yes, github actually supports svn repositories too …

Node Mockups

For the Python node scripters: The node mockups used in the proposal are all defined in a huge script file. Knock yourselves out!

https://github.com/lukastoenne/proposal-2.8/blob/master/blendfiles/object_nodes.py

Inside the Blender Cloud addon

$
0
0
Blender Addon: textures

In the first week of May we released the Blender Cloud addon. This addon provides an interface to browse the texture library of the Blender Cloud, download textures, and load them into the current scene. In this article we describe some of the more interesting technical aspects of the addon: the use of the asyncio module with the async/await syntax introduced in Python 3.5.

Blender Addon: textures

Before we go on to the details: subscribe to the cloud! Tell all your friends to subscribe! We need subscribers to be able to keep up development of the cloud and the addons.

Asynchronous communication

The addon communicates with Pillar, the back-end service of the Blender Cloud. It is a REST service that lives at https://cloudapi.blender.org/. Pillar is a Python service we built on top of Eve, and talks JSON with the Blender Cloud addon. Pillar provides all the project management and metadata, while Google Cloud Storage stores the actual texture files.

One of the core design principles of the addon was that it should not block the Blender user interface. We want communcation to be performed in the background, while we update the GUI as soon as new data is available. There are multiple approaches to this:

  1. Non-blocking socket I/O. This allows the code to download data that is available, and do other stuff (like drawing the GUI and responding to user events) instead of waiting. This often results in overly complex code, as you have to maintain a download queue yourself.
  2. Multi-threading. This allows threads to run in the background and use the simpler blocking I/O. The code becomes simpler, but you cannot call any Blender code from threads other than the main thread.
  3. Multi-processing. Processes take longer to create than threads, especially on platforms without fork() call (I look at you, Windows). You also cannot call any Blender code from other processes.

We chose a fourth, more modern option: asyncio. It allows co-routines to run concurrently, even on the same thread. These are the motivations to choose asyncio in favour of the above alternatives:

  1. Bundled with Python and supported by new syntax, most notably the await and async def statements.
  2. Allows for clear “handover points”, where one task can be suspended and another can be run in its place. This provides for a much more deterministic execution flow than possible with multi-threading.
  3. Support for calling callbacks in the same thread that runs the event loop. This allows for elegant parallel execution of tasks in different threads, while keeping the interface with Blender single-threaded.
  4. Support for wrapping non-asyncio, blocking functionality (that is, the asynchronous world supports the synchronous world).
  5. Support for calling async def methods in a synchronous way (that is, the synchronous world supports the asynchronous world).
  6. No tight integration with Blender, making it possible to test asynchronous Python modules without running Blender.

Blender Addon: folders

The asyncio event loop

The event loop is the central execution device provided by asyncio. By design it blocks the thread, either forever or until a given task is finished. It is intended to run on the main thread; running on a background thread would break the ability to call Blender code. For integration with Blender this default behaviour is unwanted, which is solved in the blender_cloud.async_loop module as follows:

  1. ensure_async_loop() starts AsyncLoopModalOperator.
  2. AsyncLoopModalOperator registers a timer, and performs a single iteration of the event loop on each timer tick. As only a single iteration is performed per timer tick, this only blocks for a very short time — sockets and file descriptors are inspected to see whether a reading task can continue without blocking.
  3. The modal operator stops automatically when all tasks are done.

Other addons will likely be able to use this functionality as well. However, as the addon is still under heavy development, the internals might change. Be sure to catch up with Sybren if you’re interested in following development.

More info can be found at the wiki.

The future of the GUI

The GUI of our Blender Cloud addon will change. The current GUI is based on Manu Järvinen’s Asset Flinger addon, which draws itself on top of Blender’s UI using OpenGL. As a proof of concept this is fine. A future version of the addon will integrate nicely with the Asset Engine that Bastien Montagne is working on.

An In-Depth Look at How B-Bones Work – Including Details of the New Bendy Bones

$
0
0
how_bbones_work-01

Here’s a breakdown of how the B-Bones in Blender work (including the new Bendy Bones stuff that I’ve just committed to master – also see the other post in this series, which focusses more on the features themselves). I’m writing these notes up mainly so that I have something to refer to again in the future, if/when I need to do further work on this stuff. It took me a little while to figure out how some of this magic all fits together. However, now that I’ve figured this out, it turns out that it’s quite easy to see all the extension points that this system has for adding interesting + useful features quite easily in fact. Therefore, before I forget about all this again, here we go!

BTW, all the diagrams within were done using Grease Pencil 🙂

(Cross Posted from my original blogpost – http://aligorith.blogspot.co.nz/2016/05/an-in-depth-look-at-how-b-bones-work.html)

The Magic Function

It turns out that all the magic for B-Bones lies in a single place: b_bone_spline_setup() in armature.c

This function is responsible for calculating the 4×4 transform matrix for each segment in the B-Bone. It takes 3 arguments:

  • pchan – The B-Bone that we’re calculating the segments for
  • rest – Whether we’re calculating the “rest pose” of the bone or not (more on this in a moment)
  • result_array – The array where we’re going to write the transform matrices (one per segment)


Most of the time, the function gets called like this (pseudo-code for the loop):

for (pchan in bones) {
   Mat4 bbone[MAX_BBONE_SUBDIV];
   b_bone_spline_setup(pchan, 0, bbone);
   /* ...do something with the bbone data... */
 }


Several things to note about this code:
1) The bbone segments usually get allocated on the stack, and we just create the maximum sized array. 
– Stack allocation since these results are usually just throwaway (i.e. it’s only calculated when it’s needed, but not stored between calls to this).
– We just use the maximum array size since it simplifies things, but also because the bezier routines in Blender (that are used for everything Bezier related, from 3D curves to F-Curves to B-Bones) can support at most 32 subdivisions between each pair of control points.  This is why the Segments property is limited to 32 segments


2) The “rest” parameter is set to 0.  In general, most of the time when working with BBones, you want to pass zero for this parameter, as you want to see the B-Bone with all the deforms (e.g. for visualising in the viewport, for constraints, or as part of calculating the final transforms).


However, it’s important to note that we can sometimes have rest == 1. As I discovered (when I finally figured out why the BlenRig rigs had been exploding), it is very important that we pay attention to this case, which gets called twice in Blender  (once by the armature modifier when deforming geometry, and another when automatic weights are being calculated).

rest_parameter-01

The “rest” parameter basically says whether we’re calculating the restpose shape of the BBone, or whether we’re computing the final deformed shape of the BBone.

bbone-restpose-double_transform_bugBug – No restpose cancelling of BBone deforms == “Double Transform”

It is necessary to calculate the restpose of the bbone (and not simply use something dervied from the bone vector itself), as it allows us to do fancy stuff like “cancelling out” the contribution of the editmode shaping of the BBone from the final deform; if we don’t do this, you’d end up with points getting “double transformed” by the BBone (i.e. because we reshaped the BBone in editmode to match the geometry more, the BBone would deform the curved mesh further if we didn’t cancel out this restpose deform first). In other words, the final deform applied to the mesh is the difference between the restpose and deformed states of each segment.

3) All these transforms are in “bone space”. That is, all of these segments are calculated relative to the head and tail of the bone, and cannot just be used standalone. Instead, you need to multiply these by the bone’s “pose matrix” (i.e. pchan->pose_mat) to get these in pose space, if you want to be able to make another bone follow the shape of the B-Bone  – that’s how the new “Follow B-Bone Shape” option for the Head/Tail target locations for Constraints works.


How B-Bones Work

So, how exactly do B-Bones work?

how_bbones_work-01


We treat the bone as a section of a Bezier curve – in much the same way we’d treat a section of a F-Curve between two keyframes.

  • Each “B-Bone segment” of the bone represents a tesselated point of the Bezier curve.
  • The control points at each end of the curve are the endpoints of the bone.  
    (pose_head = v1, pose_tail = v4)
  • We construct handles on either end of the bone to control its curvature
    (h1 = v2, h2 = v3)
  • We also compute a “roll” value (or twisting around the main – y – axis of the bone), and do so per-segment, by interpolating between the start and end roll values
    (roll1 = start roll,  roll 2 = end roll)
  • For each segment, we can also introduce some scaling effects to adjust the thickness of each segment (see notes on extension points)

bezier_interpolation-01The real magic to getting Bendy Bones here is in how we determine where those handles are relative to the control points, and how long they are.

  • “Classic” B-Bones did this by using the endpoints of the next and previous (i.e. first child and  parent) bones as the coordinates of the handle points (h1 and h2 respectively).
  • “New” B-Bones apply offsets to these handle positions (Curve Offset X/Y) on the plane perpendicular to the bone’s primary (y) axis, on top of whatever the “base” h1/h2 positions were. More on this later…
  •  “New” B-Bones also have the option to use specific (potentially unrelated) bones for the next/prev handles. More on this later too…
  • And, if all else fails, we just use some “default” handles, which are in line with the bone along the y-axis…
  h1 = (0, hlength1, 0)
  h2 = (0, -hlength2, 0)

* Knowing the position of the handle vertex, we convert that to an orientation by normalising, and scale by the handle length. So,

 h1_final = normalise(h1) * hlength1
 h2_final = normalise(h2) * hlength2

* The length of each handle (hlength1 and hlength2 respectively) is based on the “Ease In/Out” properties, the length of the bone, and a magic-number factor (“0.5f * sqrt(2) * kappa”, where kappa = the handle length – apparently this formula allows “for near-perfect circles”). i.e.,

 hlength1 = ease_in  * length * 0.390464f
 hlength2 = ease_out * length * 0.390464f


Code Structure

Knowing the general idea of how B-Bones work, how do we translate those insights into features? How is it implemented, and what does that mean about how we can extend it?

First, here is a little diagram of all the main parts of the code. Note that this is before the new B-Bones features were added:

code_structure-old-01

So, what do each of these parts do?
1) Irregular Scale – This tests if non-uniform scaling is being applied (i.e. one of the axes is fatter than the others). If so, some scaling corrections will need to be applied to the bone length (and again later – in step 8).

NOTE: Be careful about the checks here. I ran into a bug where the new B-Bones (just the offsets, no traditional bone-handles were involved) were flattening out when the bone was being scaled up by about 8.15 – 8.16. It turns out that due to floating point precision errors (it checks for 1 ^ -6 differences between values), it was occasionally tagging the bone as having non-uniform scaling when it passed through that range, causing the bone length to go from ~1 to > 8. As a result, the new B-Bone offsets were overpowered, causing the bone curve to flatten out!

2) Handle Lengths – This just calculates the length of each handle (hlength1, hlength2) from the bone length and the Ease In/Out settings

3) Get Handle Bones – This tries to get the next (child) and previous (parent) bones to act as handles for the B-Bone. If the parent is not connected to the bone, it isn’t used.

4) Compute Handle Verts for h1 –  This computes the coordinates of h1 (the starting handle). The logic here works something like this:

if prev != null:
   # Use previous bone as handle 1
   h1 = convert_to_bbone's_local_space(prev.pose_head)
   h1 = normalise(h1) * hlength1

   if prev.segments == 1: # control bone, not bbone
       roll1 = interpolate_prev_roll(prev)
   else:
       roll1 = 0
else:
    # Use dummy, bone-aligned handle
    h1 = (0, hlength1, 0)
    roll1 = 0

5) Compute Handle Verts for h2 – Just like step 4, except this works on h2, and uses the tail of the next bone. It also tries to do a bit more “stuff”

if next != null:
    # Use next bone as handle 2
    h2 = convert_to_bbone's_local_space(next.pose_tail)
    if next.segments == 1: # control bone, not bbone 
         h2.y = -length   
    h2 = normalise(h2)
    roll2 = interpolate_next_roll(next)
    h2 *= hlength2  # only negate the handle now...
else:
    # Use dummy, bone-aligned handle
    h2 = (0, -hlength2, 0)
    roll2 = 0

7) Bezier Calculations – This is the step where the bone vertices (pose_head, pose_tail), handles (h1, h2), and roll values (roll1, roll2) get evaluated as a Bezier curve. It is done per-axis – treating each one as a Bezier curve itself, before the roll is also calculated in a similar manner. The result of this step is that we get an array of 4-item tuples (x,y,z + roll) – represented as a flat array – that has the coordinates we need for the next step…

bbone_bezier_calcs_01

8) Compute Per-Segment Transforms – Here’s where we wrap things up, converting the point + roll tuples (8a) from the Bezier curve evaluation into the 4×4 transform matrices needed (8b) by everyone else. Then, if irregular scaling was detected (in step 1), scaling corrections need to be applied to this matrix…  The resultant 4×4 transform matrices are stored in result_array.


Implementing New Features – Extension Points, and How the New B-Bones Work

Now, let’s see that diagram again, with all the new parts added (highlighted):


code_structure-new-01

The following steps were added/modified for the following reasons:

  • 6, 8d – (Added) – These steps are where the Bendy Bone magic happens! See next section for details about what and why.
  • 3 – The “Use Custom BBone Reference” option is implemented here. It’s probably quite simple to see how this can be implemented: When the option is on, just use the specified bones instead of using trying looking at the bone’s neighbours.
  • 4, 5 – The “Use Relative” options for Custom BBone references are implemented here. This is because instead of using the endpoints of the bones as absolute points in 3D space which we then map into the bone’s space to use as its handles, we instead take a look at where the reference bones are relative to their restpose – this delta transform is then applied as to the bone’s own endpoints to get the handle locations.


How the New Bendy Bone Options Work

As a reminder, here are the new controls that have been added for B-Bones, with annotations showing how they work:

bone_settings_demo-01.blend

Here’s how those properties are mapped to the B-Bone evaluation method:
Affect’s Bezier Curve Calculations => Applied in Step 6 as offsets to these values…
Roll In/Out                                      –> roll1, roll2
Curve X/Y In                                  –> h1
Curve X/Y Out                               –> h2

So, the Roll values are basically rotational offsets applied on to of the rotation stuff that already has to happen.

   The Curve X/Y values work by skewing the pushing the handles further out on the plane perpendicular to the main axis (y). As a result, the handle moves further from its original location, causing the curve to bend.

Affect’s B-Bone Segments (but doesn’t impact the curve calcs)  =>  Applied in 8d over the top of whatever else is already there…
Scale In/Out  –> Scale In and Scale Out are combined together to get a “combined scale factor” (for X and Z axes only, to affect the segment thickness but not its length). The influence of each factor is made to fade out over the length of the bone chain, going from each end to the other. Then, this scaling transform gets premultiplied with the existing transform matrix to get the final result.


The “Rest Pose” for Curved Bones

Sometimes, it’s useful to be able to have the B-Bone start off curved. For example, if you have a model with some curved facial features you wish to deform using B-Bones, if the B-Bones could only only be straight lines (as previously) the weighting wouldn’t be so great (as the B-Bone didn’t match the geometry). Instead, you’d end up having to add a whole lot more bones to compensate!

bbone-restpose_curves-motivation

Motivation for Curved B-Bone Rest Poses – Character from Abel Tebar

By having the ability to define some initial curvature for B-Bones (i.e. for the restpose of the bones, in editmode), this problem could be solved! That’s what we’ve done here…. Implementing it was simply a matter of having two sets of the Bendy Bone properties – one for Bone/EditBone (i.e. the RestPose/Base Rig) and another for PoseBone (i.e. what animators work with) – and adding together their values to get the final transforms.

278-bendy_bones-CurvedRestPose-01

The only complication is that we need to account for the restpose shape when computing the necessary deforms, or else we get a “double transform” effect (see notes above regarding the “rest” parameter to b_bone_spline_setup())

Other Assorted Notes

* Constraints Head/Tail option follows curvature of B-Bones – There are times when it’s useful to allow constrained bones to follow the shape of B-Bones, without having to set up an additional complex system of additional bones to do the same thing.

278-bendy_bones-ConstraintHeadTail_Follow-01

It turns out that implementing this is quite simple in fact! You just need to call b_bone_spline_setup(pchan, 0, bbone_segments);  then you have the segments that you can perform some interpolation with to get the final transform.   And so far, performance doesn’t really seem to be bad enough that we’d want to cache these off instead…


* Edit Mode preview of B-Bone curvature shape – Previously, there was no real B-Bone preview in EditMode. You could see that a B-Bone had a certain number of segments, but that was it. And really, it was sufficient, as in EditMode, the bones by definition are all in the rest poses, so there really should not be any bending going on with the “Classic” handles.

However, if we want to have curved restposes for B-Bones, we also need a way to see how they look. I ended up having to create a copy of b_bone_spline_setup() – ebone_spline_preview() in drawarmature.c – that is used for this purpose. It only calculates the Bendy Bone effects (since the others don’t make sense), and it does so using EditBones (as PoseBones and Bones don’t exist; it would have been messier to have tried to make a hacky adapter to get an EditBone looking enough like a PoseBone + Bone combo to get this working using the standard method)


* Deformation Quality – I’m really not much interested/skilled in deformation quality (or rendering or mocap for that matter) work. Instead, I mostly focus on issues of control schemes, interaction methods, tools, and animation system cores. As such, any questions regarding the quality of B-Bone deforms, or how those work are not covered here.

For details about those, go consult the armature modifier for further details about how it uses the B-Bone info gained from b_bone_spline_setup().  My guess is that it calculates delta matrices for each segment, and then interpolates between these to deform points that are affected by such bones. Smoother deforms may be possible if we added an extra smoothing step in there somewhere, instead of just using the result.

Logging from Python code in Blender

$
0
0
Logs

Logs In this article we take a look at using logging inside Blender. When things take an unexpected turn, which they always do, it is great to know what is going on behind all the nice GUIs and user-friendly operators. Python’s standard library with a very flexible and extendable logging module.

To familiarize yourself with Python’s logging module itself, we can recommend the Logging HOWTO by Vinay Sajip.

Using logging in your Python module

The general approach to logging is to use the module’s name as the logger name, so your module can have this at the top:

import logging

log = logging.getLogger(__name__)

Loggers use a hierarchy of dotted names, so if you want to create a sub-logger (for example to use in an operator), you can use log = logging.getLogger(__name__ + '.my_sublogger').

To log something, use one of the error, warning, info, or debug functions (for details, see the API documentation). Be careful which one you choose, though: errors and warnings are shown on the console by default, so they can be seen by anyone. Only use those sparingly, for those things you intend to be seen by end users.

The default configuration

We keep Blender’s Python as default and standard as possible. As a result, you can just grab a Python tutorial, apply it to Blender, and get the results you’d expect. This also means that the logging configuration is bog standard. This means that by default

  1. the name of the logger is not shown;
  2. only log entries at levels CRITICAL, ERROR, and WARNING are shown.

Point 1. is important for the way you write your log messages; you have to write sentences that can be understood without knowing their context (which is a good idea anyway). Point 2. tells you at which levels to log for developers/debugging (INFO and DEBUG), and at which levels to log for artists (WARNING and above). However, and this is important: never assume that people read the log file. Communication with the user of your code should happen through Blender’s GUI.

Configuring logging

Which logs you want to see, and which you don’t, is personal and depends on your needs of the moment. As such, we can’t ship Blender with a default other than Python’s default, as there won’t be one default that satisfies everybody. This also means that your addon should not configure the logging module.

To set up the logging module to your needs, create a file $HOME/.config/blender/{version}/scripts/startup/setup_logging.py (this is on Linux, but you’re likely a developer, so you’ll know where to find this directory). If the folder doesn’t exist yet, create it. I like to put something like this in there:

import logging

logging.basicConfig(level=logging.INFO,
                    format='%(asctime)-15s %(levelname)8s %(name)s %(message)s')

for name in ('blender_id', 'blender_cloud'):
    logging.getLogger(name).setLevel(logging.DEBUG)

def register():
    pass

The register function is there just to stop Blender from nagging when it’s scanning for addons etc.

Conclusion

Now you know how to use logging, and how to configure Python’s logging module for your own personal preference. Enjoy not having to remove all those print() statements before you publish your addon!

Summer of Code 2016 – Results

$
0
0
gsoc-2014-600x540

This years Google Summer of Code is over, and the students improved Blender in many areas. Here you can find a summary of the results. Thanks to Google for having us in this years GSoC!

Beziers Curve Editing (João Araújo)

gsoc16_ beziers curves

New Bezier Tools

João worked on Blenders Beziers curves. He improved the extrusion of curves and added new tools.

  • Extend tool
  • Batch Extend tool
  • Trim tool
  • Offset tool
  • Chamfer tool
  • Fillet tool

More information can be found here.


gsoc16_layer_manager

The new Layer Manager

Layer Manager (Julian Eisel)

Julian worked on a new layer manager, allowing artists to easily work with layers, group them together, reorder them to organize them nicely and of course removing the limit of 20 layers. He also added tools for a meaningful color system (colored wireframes).
More information can be found here.


Cycles Denoising (Lukas Stockner)

Barcelona Pavillon, regular and denoised side by side.

Barcelona Pavillon, regular and denoised side by side.

Lukas worked on Cycles render denoising. It’s purpose is to remove remaining noise from rendered images while preserving more details than a compositor setup could. To do so, it collects additional information during rendering, which can either be used to denoise tiles right after they are rendered, or to denoise the image later after the rendering is completed.

More information can be found here.


PBVH Vertex Painting (Nathan Vollmer)

Vertex Blur Tool in action.

Vertex Blur Tool in action.

Nathan worked on Blenders vertex painting, improving painting performance (4-6x faster), adding new tools and mirroring functionality and finally splash prevention.

More information can be found here.


UV Tools (Philipp Gosch)

Improved Pack Island Tool.

Improved Pack Island Tool.

Philipp improved Blenders UV Tools, especially the Pack Island tool. While a bit more computation heavy, the solutions found by the new algorithm can be way better than the old “Pack Islands” in terms of used UV space. Additionally new tools were added, like Select Shortest Vertex Path, Scale to Bounds and Select Overlapping UVs. Last but not least he made improvements to snapping and UV hiding.

More information can be found here.


Cycles Texture System (Thomas Dinges)

Lower memory usage for single channel textures.

Lower memory usage for single channel 3D textures (e.g. Density).

Thomas worked on the Cycles texture system, increasing the maximum amount of textures that can be used on CUDA GPUs, and lowering memory usage in many cases, allowing artists to create more complex scenes. He also added HDR texture support to OpenCL devices.

More information can be found here.


Multi-view Camera Reconstruction (Tianwei Shen)

Multi-view reconstruction.

Multi-view reconstruction.

Tianwei added support for Multi-view Reconstruction into Blender. The main benefit for this new feature is to deliver robust camera reconstruction results as people on set often shoot witness clips to aid the solving of the main clip.

More information can be found here.


Manta Fluids (Sebastian Barschkis)

Liquid splash at 512 divisions. Simulated with the Mantaflow integration and rendered with Cycles.

Liquid splash at 512 divisions. Simulated with the Mantaflow integration and rendered with Cycles.

Sebastian integrated Mantaflow liquid effects into Blender. The exisiting Mantaflow smoke integration, which builds on top of the smoke modifier, was taken as a basis and extended to handle Mantaflows FLIP based liquid effects as well.

More information can be found here.

Viewing all 177 articles
Browse latest View live